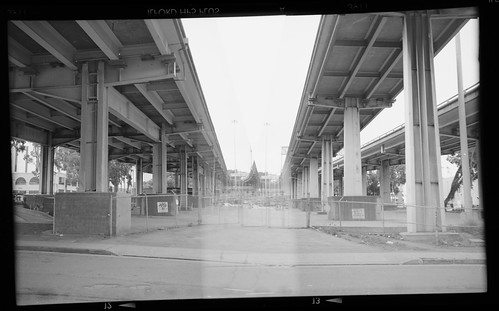
Freeway (Overlapping Frames); Zeiss Ikon Nettar 518/16, Ilford HP5+
This is the scan from my first overlapping frame test (inspired by Stephen Schaub at Figital Revolution). I looked at his technique, and was inspired (as I believe several people have been) to apply it on a 120 camera with using a red-window system, in order to precisely control the frame spacing at something besides the usual spacing. In preparation for this, I got some used 120 Ilford backing paper, and measured where a normal 6x6 frame (usually 56mm x 56mm) would go, based on the knowledge that the red window is in the center of the frame. Then I worked out what other marks on the backing paper I could center in the red window in order to get nicely overlapped frames, as well as what the next number that I could use for a frame after that would be. I came up with a few systems; to understand these, remember that Ilford 120 backing paper has a system where it shows circles of increasing size before you reach the next frame number.
- 2x overlap; place the first frame on the number, and the second frame on the second pre-frame circle. Width is about 95mm with about a 30% overlap; this uses 2 normal frames only (so if you used frame #1, and then the second circle before frame #2, the next frame could use frame #3). This is the method used in the example above.
- 3x overlap v1; 1st frame on the number, 2nd frame between the 3rd and 4th pre-frame circle, 3rd frame on the first pre-frame circle. Width is about 150mm, with about a 10% overlap between frames; this uses 3 normal frames (so if your last frame is on the first pre-frame circle before frame #3, the next frame could use frame #4).
- 3x overlap v2; 1st frame on the number, 2nd frame on the first pre-frame circle, 3rd frame just left of the next number. Width is about 120mm, with about a 50% overlap between the frames. This means that the middle frame will be almost completely overlapping the other two frames, and it looks better if you give the middle frame 1 stop or so less exposure than the outside two. This uses 2 normal frames, as with the 2x overlap technique.
My current favorites are the first two; the first one is nice and compact, and gives a combined exposure a little wider than a 6x9 frame, while having a fairly large overlap; the second one is w-i-i-i-i-ide, and the smaller overlap area should make it easier to get the overlaps to look good. However, the overlaps are what makes this technique different than just stitching together panoramic frames, and so I'd like to come up with a 3 frame technique that has closer to a 30% overlap, as compared to the 10% or 50% of my current two choices. 4 or 5 frame overlaps would be nice too, for a very panoramic view, but I think I'll try and get some more practice first before tackling that.
Speaking of practice, you can see from the doubled light posts and the strange triangular feature in the scan above that I didn't get the camera movement quite right here. More practice will help me get better with this, but I also have some additional plans to try and make this better (in a nutshell, either put the whole frame out of focus or with narrow DOF, or just make sure that the overlap portion is somewhere outside your DOF, such as at infinity with a wide open aperture).
More to come on this, including cyanotype prints of this technique, plus more scans of techniques #1 and #2.

No comments:
Post a Comment